Sunday, April 22, 2012

Technique points I keep in my mind when riding these days

The key word on my mind on a downhill turn is ROTATE, just one word but occasionally also.....

1. Rotate the belly button and looking with "three eyes" when on downhill turn
2. Leaning the bike into the turn
3. Counterbalancing the leaning with the rear part as a result of belly button turn and resulting weight shift on the seat.
3. Having the outside turn elbow bent and high
4. Looking past the turn
5. Dynamic Pedal

Going downhill and in trouble

Disclaimer: These tips are for the blog author, pls seek professional instruction as this sport may be dangerous!

What if I am going downhill and sense possible trouble. What is the first thing to do?

GET AS LOW OVER BB AS I CAN:

-getting low over the central balancing point of the bike (over the seat area and BB). If I get low the rear will move back AS A RESULT OF GETTING LOW
-elbows a bit forward as if doing regular (not military style) pushups.Or as if you were holding a basketball at chest level.

This will not work is the seat is high (impossible to get low in this case). So people move behind the seat as a compromise. This is not ideal as:
-the bike is not centrally and evenly balanced
-arms are already extended and can't be used pushing the bike forward if needed
-front wheel is unweighted and is ready to slip sideways which means imminent fall

Telescopic seat post may be an answer to the above dilemma. One word of caution. Sometimes the telescopic seat may still be too high even if completely retracted. This may give a false sense of security as I endoed once thinking that I was low because I retracted the seat but I was still overall high.
The picture provided helps understand this point. The seat is clamped in such a way that it will be still way too high for OVERALL (albeit fully retracted) downhill height for me.

Wednesday, April 18, 2012

Body bosition before ROLLING steep terrain( steep rock, ladder, etc.)

Disclaimer: These tips are for the blog author, pls seek professional instruction as this sport may be dangerous!

For rolling steep rocks, ladders, steep rolling terrain as well as position before doing a manual!

Be very LOW LOW, elbow bent like if you are doing a pushup (or as if holding a basketball at chest level). At the same time elbows are NOT too much forward.  Seat all the way down, no sitting, cowboy legs. Front heel dropped.

To correct: I tend to have my rear too much back approaching an obstacle I am trying to attack. Approach the obstacle with the rear being a bit more forward over BB. Don't forget doing it!

See first three pics (source reference: http://www.pinkbike.com/video/221262/ and http://www.endlessbiking.com/uploaded_images/IMG_0606-1-718941.jpg ) with the ready position before rolling steep terrain (chicken wings, cowboy knees, getting very low over BB, then extending arms straight down as the roll starts, it is a very subtle extension):

http://www.endlessbiking.com/uploaded_images/IMG_0606-1-718941.jpg

                                                                       
START OF THE ROLL
ONE MORE PICTURE OF THE ROLL START
ARMS EXTENSION
Extending arms straight down (it will look as the extension is down and forward but it is a subtle downward movement only. It also helps move the rear back. The bike will move the arms forward, NOT the rider. The rider remains very low)
                                                                

Friday, April 13, 2012

Less immediately known to a biginner things that come loose

1. The bolt that hold rear derailleur (was very loose after a year of riding, I discovered it by accident)
2. The bolt that holds rear derailleur hanger (when I take the rear wheel off, I tend to check it)
3. The pivot bolt that is behind the bottom bracket (watch for this one!)

Disclaimer: These tips are for the blog author, pls seek professional instruction as this sport may be dangerous!

Wednesday, April 11, 2012

Vertical Manual Drops

Disclaimer: These tips are for the blog author, pls seek professional instruction as this sport may be dangerous!

Manual is done by me without pedaling and in two steps:
 1. Staying low preloading down suspension the last moment before the drop pushing down on the pedals
 2. Pushing with the front foot towards the hub of the front wheel (such motion will MOVE THE BIKE FORWARD UNDER YOU and as a consequence will shift your body  back extending forward arms and legs. Do not pull up on the handlebars, the leg force towards the front hub in this step will prevent the front part of the bike from dipping). KEEP THE FRONT HEEL BENT DOWN in this step!

 Start returning to the ready position while in the air so when landed you landed low in ready position and not shifted back.

Match the bike traveling in the air with the angle of the landing area (angled the same way to match)

Pedal several bike lengths before the manual maneuver area. COAST before, during and after doing the manual.
Speed will help doing the manual and will prevent dipping of the front wheel.

PRACTICE UNTIL YOU CAN DO IT AT A VERY LOW SPEED


Manual summary: don't pedal when you are about to manual, preload suspension pushing down, push with the front foot with the dropped heel towards the front hub of the bike. This will move the bike forward and you will naturally extend arms and legs and the rear part of the body will be moved back. Don't move your body back, let it happen as a result of pushing the pedals towards the hub of the front wheel.


Vertical drops (low speed) up to 2/3 of knee height

Disclaimer: These tips are for the blog author, pls seek professional instruction as this sport may be dangerous!

These drops can be steep step-like roots, steep rocks and steep ladders.

STAY LOW LOW LOW approaching the drop.

DO NOT move back in advance when you are still riding on flat terrain before the drop. LET THE BIKE DICTATE HOW MUCH YOU NEED TO MOVE YOUR REAR BACK AS YOU GO OVER THE OBSTACLE, NOT BEFORE THE OBSTACLE. 


My rear should not be back but balanced over BB.
As you drop pushing straight down on handlebars there is an illusion that the butt moves back, it does not: the bike angles nose down and creates such illusion. If I stay back, front wheel will loose pressure and traction.


The acceptable height of a drop to attempt with such technique can be measured by standing next to it with hands on the same line as the top edge of the drop (imagine that the top imaginary line of the drop edge is the handlebar). Extending arms down should be such that hands touch the bottom of the drop. The drop height should be no more than full arms extension from the top to the bottom of the drop. This also about 2/3 of my knee height. If the drop is BIGGER than the full arm extension this technique should NOT be used.

Doing the drop I get low low low low in the attack position, push the handlebars straight down, (it is a subtle push if it is a rolling long rock or ladder) NOT forward. I Don't move back, I stay neutral hovering over the seat (Bottom bracket) area, and I don't sit.

Assume ready position right after the drop is done. The technique allows for a very quick return to the ready position to address right away other obstacles.

Mistake: moving/shifting back. Getting low WILL move the rear back but as a "side effect".  Pushing forward instead of down.

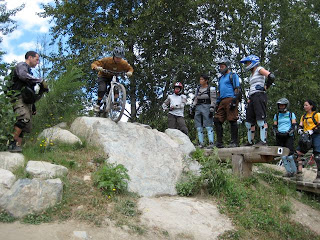
I use the same technique when rolling off the rocks and skinnies (On the picture below I pushed down in a subtle way  on handlebars on the final steep part of the skinny (which is by the rear wheel on the picture). I also made sure that I was LOW LOW LOW with (doing a pushup or holding a basketball like) elbows and centrally balanced (not positioned back with extended arms, bad idea!)
Angling the palms on the handlebars can help maintain correct elbow position
On the obstacle on this last picture I used exactly the same technique pushing down on handlebars and being low and centrally balanced.


I use the same technique rolling off relatively long steep rocks and long ladders. There are two adjustments to make. As usual start with chicken wings in a low low low position centrally balanced over BB, then:
1. There is a subtle extension of the handlebars DOWN when the front wheel starts rolling down (as the technique described above) and a bit of a hold as you roll the long rock or long ladder. As the front wheel touches the "landing area" absorb the curve with the arms and get back into low low centrally balanced position with chicken wings.


Slow speed drop technique works on the similar to these features as well:


Friday, April 6, 2012

Cornering- my formula


Disclaimer: These tips are for the blog author, pls seek professional instruction as this sport may be dangerous!


http://www.pinkbike.com/news/Video-of-the-Year-Winner-is-2012.html
In the picture above one can see correct body position while cornering (hips are rotated and offset to the side, shoulders and belly button turned into the corner, high outside elbow, bike is leaning into the corner.

I noticed it is hard for me to remember and cycle in my brain through BRAKE-ROTATE-LOOK-LEAN mantra.
So here is my simplified one and it is all about STEERING WITH BELLY BUTTON:

Belly Button- High outside elbow

You look with all "three eyes" (belly button being one, then you think about high outside elbow (e.g if you turn left, I should have right elbow bent and high.

Rationale:
When you turn with the belly button, this move rotates your hips, shoulders and offsets the rear part of the body. This also forces me to look in the right direction.
High  outside elbow will force me to lean the bike.
I will not forget to adjust the speed before I do all of the above because...I really don't want to fall!

So new mantra is again

Belly Button- High outside elbow- and as of May 11, 2012  Dynamic pedals


Wednesday, April 4, 2012

Forward and back movement on the bike

Disclaimer: These tips are for the blog author, pls seek professional instruction as this sport may be dangerous!

This is a very subtle point:

MOVE THE BIKE UNDERNEATH ME FORWARD AND BACK, NOT THE BODY.
It is the same as standing next to your bike and moving it forward and back.

Fast cornering

Disclaimer: These tips are for the blog author, pls seek professional instruction as this sport may be dangerous!

Sequence: Brake -rotate-look-lean

I Get LOW into ready position
1.Brake to enter the turn at the right speed. Try to enter wide
2. Rotate hips and shoulders (move hips to the outside of the turn, belly button looking inside the turn). Hips and shoulders rotate in the same plane, bum sticks out to the outside of the turn
3. Look past the turn towards the exit. Don't look on front tire or directly in front.
4. Lean the bike into the turn, have outside elbow high and bent
USE DYNAMIC PEDAL IDEA !

Chest should stay low, drop heals down. Stick out high outside turn elbow

Note: For aggressive maneuver: While hips move in the opposite direction of the turn, with bum sticking out outside of the turn, upper body may lean INTO the turn

If I feel I am not making the turn, push down on the pedals to compress suspension.
This may result in two things:
a) the bike falls on the side and there is a good chance not falling with it
b) tires will bite more, turn radius will decrease and you make the turn


EB Riding Tip:

http://www.endlessbiking.com/guides.htm

Cornering tip: To develop solid cornering skills for moderate to high speed flat corners, try rotating your torso to look into the desired direction of your turn with 'all 3 eyes'. As you increase speed, get lower and lower to keep a low centre of gravity, to be able to lean the bike over farther to gain traction and maintain momentum! Have fun!