Saturday, December 31, 2011

Bridal Path Gears

Disclaimer: These tips are for the blog author, pls seek professional instruction as this sport may be dangerous!

So far I have been using the following gear combinations on Bridal Path, Seymour, N. Vancouver:

1. Golf Course parking lot-> Horse Loop until the "T" intersection by the fence (before the uphill section)- GRANNY and BIGGEST RING in the back.

2. For the remaining sections (with some exceptions) -MIDDLE ring up front, THE BIGGEST ring in the back.

3. For "step-like" obstacles MIDDLE ring up front, THE SECOND BIGGEST ring in the back.

4. Very steep section going East not far from the "T" on the Hyannis side (I will post a separate post with the picture) GRANNY ring up front, THE SECOND BIGGEST ring in the back. I tried to climb while sitting.

5. I will try to post pictures with "tricky" sections and the gears used.


Granny ring vs Middle ring

Disclaimer: These tips are for the blog author, pls seek professional instruction as this sport may be dangerous!


By trial and error I came up with the following:

Granny chain ring- good for climbing steep terrain where one is likely to sit all the time. This gear does not provide "torque on demand" if you stand up and it is ideal for obstacles of the type "if you stand you rear wheel will spin".
Great to use on a very steep terrain with the SECOND biggest ring in the back! You would likely to sit or hover over your seat.

Middle chain ring- good with tall obstacles where one will coordinate pedal push with a partial or full standing up motion. Also ideal for moment where short "torque on demand" burst is needed (e.g. to roll over a tall rock or root on otherwise relatively flat terrain).
Great with the BIGGEST or SECOND BIGGEST ring in the back.

WET CONDITIONS:
If the obstacle is not super steep and it is WET, I use the middle ring up front and SECOND BIGGEST in the back to avoid back wheel spinning. (during dry conditions, the BIGGEST ring in the back can be used).

For greater cardio-use middle ring up front (except for very steep terrain) and the BIGGEST or SECOND BIGGEST ring in the back.

For smooth (no bursts of energy) riding and a bit less cardio- use the granny ring up front and the BIGGEST or SECOND BIGGEST ring in the back.


Wednesday, December 21, 2011

Ideal stem hight?

Disclaimer: These tips are for the blog author, pls seek professional instruction as this sport may be dangerous!


Lower is better than higher. By far!
After the conversation with Drew from Different Bikes I realized that the lower stem makes it for much much better steering control, body position and overall riding.
It is simple to "hunt for" the sweet spot: no cutting of anything is needed. I simply took a big fat spacer from the bottom and put it on top of the stem!
I was amazed what a couple of mm do in this context, it may as well be miles of distance for a bike-less-self-propelling individual in a totally different context.

And yes, I made sure that all the bolts are tight when I was done: I first loaded the star nut and then tightened the stem bolts, not the other way around!

Remember the pedals!


Disclaimer: These tips are for the blog author, pls seek professional instruction as this sport may be dangerous!


See more than "beating" an obstacle!

Today I was so focussed making it over a log or a root patch that I would lose awareness of what my pedals were up to. And they were hitting many things that they encountered (mainly nice rocks already scratched by other riders).

I call it riding in sync (thank you Assassin's Creed for inspiration with the term). Will your pedals hit something when you are laboring over an obstacle or on its approach to it or not? That is the question! Sometimes ratcheting back is a great way to avoid being "out of synch"

Pinky toe and sticking roots

Disclaimer: These tips are for the blog author, pls seek professional instruction as this sport may be dangerous!


Protect your pinky toe!

I was pedalling uphill and somehow my shoe got caught under the protruding obstacle. I had no idea that I could have a huge hematoma on my pinky toe because of this.
When you are so focused on the big goal while pedalling (to make it through a tough section) don't forget about little nasty "pocket-like" obstacles that are often visible only in your peripheral vision. Try to keep track of everything that protrudes less than 90 degrees on the SIDES of the trail and can catch the pedal and the front part of your shoe. It will hurt!

Bridal Path Suicide connector (towards Fisherman's trail)


Disclaimer: These tips are for the blog author, pls seek professional instruction as this sport may be dangerous!


I never thought I could do this...

This is the beginning part of the Suicide Connector. I was quite comfortable doing the first part of the line but the second (almost vertical line on the picture) was impossible for a while...
Today I did it! The gear: middle ring up front, second biggest at the back (it did not work with the third biggest at the back, I ran out of energy and was spinning on the last root, sometimes too much torque is bad too)
Weight distribution: 70% legs, 30% seat
Tire pressure: around 20-22PSI (tubeless)
This is probably the easiest line but for those who just start, I highly recommend!

Attached is another picture of the hardest part of this line at the very top. It is not very steep and the pictures make it look easy, but when you are there, it ain't easy at all and on a second thought it is.... bit steep.

Saturday, December 17, 2011

Brake lever position and seatpost remote

Disclaimer: These tips are for the blog author, pls seek professional instruction as this sport may be dangerous!

I placed the brake in such a way in relation to the grip so I could use only one (index) finger for braking. You don't want to lose grip on something rough and that's what the other fingers are for- to wrap the handlebar!

As to the telescopic seat remote. I mounted it on the right. This is a very debatable point on the Internet. Why it works for me? I normally decide to drop the seat before I start descending. I also use the front brake more to control the bike speed while descending. I want to have a good hold on my front brake and not to worry about getting distracted with dropping the seat with my left front braking hand.

Dynamic riding

Disclaimer: These tips are for the blog author, pls seek professional instruction as this sport may be dangerous!

What I understood about North Shore riding is that it is a very dynamic process. I find that I constantly do little things based on the terrain situation that are not always noticeable from the side:
  • shifting back and forth
  • slightly pulling up on the handlebar with coordinated push on a pedal
  • lowering and raising the seat
  • switching to the appropriate gear to accommodate the terrain situation
  • leaning the bike
  • putting more weight in different places
  • lifting from the seat (60%-40% weight distribution or so) or standing altogether
  • doing or not doing many other things that I should or should not
Conclusion? I will take classes from Endless Biking!

To bashguard or not to bashguard?

Disclaimer: These tips are for the blog author, pls seek professional instruction as this sport may be dangerous!


A very dirty bashguard...wash me!
The answer is simple!
I broke several teeth on my biggest chainring (it's a triple crank) by hitting rocks. I hardly ever used it and once I even cut my leg with it.
As I never installed the bashguard before, I was a bit cautious with this idea and avoided it for some time. Looking online in various places I discovered the following:
  • You don't need to pull the crank to install the bashguard
  • All you need is a multitool.
  • I didn't need a special key to hold the special nut on the inner side of the crank, the bolts tightened very well (I used a bit of locktite, I am not sure whether it is an overkill though)
  • I unscrewed the four bolts that hold the biggest chainring making sure the middle ring was still in its place (you see the bolts on the picture).
  • The above took me 5 minutes.
  • I screwed IN the H screw on the front derailleur (it is a triple shifter) to avoid shifting by accident over the bashguard on the non existent biggest chain ring.
  • That was it! Finito!
  • I will check the bolts before my second ride with the bashguard to make sure they are tight.
  • It took me 1 minute to put the biggest chainring in the garbage.
  • Why did I do it in the first place? To improve clearance, eliminate jamming of the bike on the logs, eliminate potential cuts to the lower leg, to try something cool!
  • I have not tried the Stinger yet!

Rolled ankle

Disclaimer: These tips are for the blog author, pls seek professional instruction as this sport may be dangerous!


My ankle.....ouch!

When I just started riding, I rolled my ankle several times when performing an "emergency dismount". A typical case is:
  • your bike hits an obstacle, then you jump off the pedals, then you lend with one foot on a root or some other uneven surface, then your foot rolls and you twist your ankle and most likely fall sideways dragging onto yourself the invisible blanket of humiliation...and your bike
  • With the injured ankle you do it again and it hurts again! ...but more!
The tip that works for me:
  • I try to place the HEEL of the foot on the ground first! Simple but truly miraculous solution to prevent ankle rolling and/or getting re-injured.

That pesky barrel adjuster

Disclaimer: These tips are for the blog author, pls seek professional instruction as this sport may be dangerous!


Almost looks like a barrel adjuster.....

It was very confusing to understand which-way-is-which and what-it-does so to say when turning a cable barrel adjuster (for front and rear derailleur).

First, clockwise and counterclockwise, how the heck do i grab a barrel adjuster so I can use the notion of clockwise and counterclockwise?
  • Draw an imaginary arrow pointing FROM the cable and TO where barrel adjuster is attached to its main assembly. Grab the barrel in the direction of this arrow.
  • Barrel adjuster does not simply pull the inner cable. This would be way too simple! It works by applying pressure (or relieving pressure) on the HOUSING.
  • If the tug of war rope is the inner cable, the soil in which you dig your feet is the housing!
  • When you turn the barrel adjuster clockwise you "screw the barrel into the main assembly" RELIEVING pressure on the housing which in turn LOOSENS inner cable.
  • When you turn the barrel adjuster counterclockwise you "unscrew the barrel from the main assembly" COMPRESSING the housing which in turn TIGHTENS inner cable.
Once you understand the above poins you no longer need to think "it is opposite of what happens when you drive a screw into plywood" or "tightening the barrel adjuster means loosening the cable and the other way around". Hope it makes sense now!

Friday, December 16, 2011

My bike


Disclaimer: These tips are for the blog author, pls seek professional instruction as this sport may be dangerous!

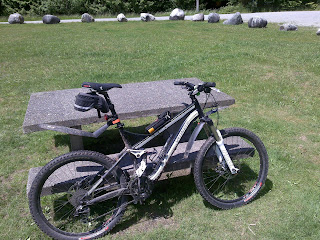
Nothing fancy. 2009 Pitch Comp.
Modifications that worked for me (the picture is taken before the upgrades):
-Bashguard instead of the biggest chain ring
-Reverb 125mm seatpost
-Really wide Chromag handlebar (excellent upgrade, makes for great steering control)
-Chromag short stem (50mm) It's better to have a short stem with a wide handlebar to eliminate overall flex
-Lowered stack (two spacers removed)
-WTB gel based seat (very comfortable)
-Bear spray mounted on the frame
-Tubeless conversion (Stan's). I run quite low PSI and no burping so far.
-Maxxis Minion DHF 2.5 EXO 3C tires (I swear by them now, no other tire will be used again, nope!)
Thank you Drew from Different Bikes suggesting that it is better to have a shorter stack. Steering, climbing and control improved a lot. It is amazing how much difference a couple of mm make in this regard! What about yours? So far it has been the biggest most useful tip for me!

Riding in the rain


Disclaimer: These tips are for the blog author, pls seek professional instruction as this sport may be dangerous!

I rode today in wet rainy weather. And last time too and next time as well...
I can't even think what it would be like without the following things that are crucial for riding in wet conditions for me:
  • Tubeless converted tires (Stan's rimstrips and sealant)
  • 28 or so PSI tire pressure (I am 240 lb)
  • March 4, 2012 correction: I ride with 20-22 PSI now
  • Maxxis Minion EXO DHF 2.5 (both front and back)
Practically no side-slipping on wet roots! Very predictable lines and riding.

December 31, 2011 update:
I find myself riding with 20-22 PSI now as 28 seems way too much for such conditions. I even deflated the tires a bit to achieve the lowest possible pressure without hitting the rim.

Welcome to IgorBikingTheMountain blog!


Disclaimer: These tips are for the blog author, pls seek professional instruction as this sport may be dangerous!

Hello,


I am a MTB novice. Just like many of us out there and who are a bit shy to ask experienced people for some advice....
It is great that there is such opportunity as learning XC Mountain biking on North Shore, probably the best place on earth to do it.


Why create this blog? I have felt intimidated for a while by seeing all those expert bikers who look like gatekeepers of very useful insider information about this sport.

In this blog I will try to share bit by bit what I learned about riding, bike setup, obstacles, etc, providing some information that may be interesting for other beginners (and myself too!)
The information (often anecdotal in nature) is gathered from conversation in bike stores, my own trial and error experiments and from often serendipitous conversations on the trail with other bikers.

Take it with the grain of salt and seek professional advice as what works for me may not work for you! This sport can be dangerous so always use professional help!
All information is based on the author's personal experience and therefore is subjective in nature!