When installing new rear derailleur shifter cable I was suggested the following:
First set H limit screw (cable is not attached)
Move the derailleur by hand inward to adjust L limit screw
H screw controls outermost limit
L screw controls INNERMOST (towards the center of the hub) movement
Before attaching derailleur cable:
Screw in barrel adjuster ALL THE WAY IN
Then unscrew it 8 clicks
Then pinch the cable to the derailleur.
Adjustments:
The chain does not move towards inner cogs - too little tension, tighten the cable
The chain does not move towards quick release side cogs (outwards)- too much tension, loosen the cable
General principle:
More tension moves the derailleur towards the center of the hub (inwards)
Sunday, December 23, 2012
Saturday, December 8, 2012
LIGHTS FOR NIGHT RIDING
I don't know about you, but I can't spend hundreds of dollars for a bike light. I buy lights here (Magic Shine):
http://dx.com/s/magicshine.html?page=1
So far no problems, delivery times are a bit long but they are reasonable.
I have a 1000LM Magicshine light, did 4 rides in rain, long term review will be posted in the spring
http://dx.com/s/magicshine.html?page=1
So far no problems, delivery times are a bit long but they are reasonable.
I have a 1000LM Magicshine light, did 4 rides in rain, long term review will be posted in the spring
Hard obstacle- straight line pls!
Met an experienced biker today he told me this:
Try to cross an obstacle (up or down) in a straight line. Build a line in advance, turn and maneuver in advance so when it is crunch time (something hard to go over), you are traveling straight as an arrow! Build your lines so that you travel in straight lines as much as possible in general!
Try to cross an obstacle (up or down) in a straight line. Build a line in advance, turn and maneuver in advance so when it is crunch time (something hard to go over), you are traveling straight as an arrow! Build your lines so that you travel in straight lines as much as possible in general!
Sunday, August 19, 2012
Riding acronyms: "BLT Day" and "LLR". What are you talking about?
As I sat at home after a tooth extraction (unrelated to biking) I came up with two fundamental acronyms about MTB riding:
BLT
B
Balance your weight on the pedals going down (this allows to keep the handlebar light among other things. Very good tip for steep descending terrain
L
Light hands heavy feet. This is the main riding tip, the holy grail (helps with weight distribution, floating over obstacles, not loading too much the front end, etc)
T
Three D riding- this is about putting more or less weight on the bike using the feet: (at any moment being either light or heavy, like a wave). Light- offloading on difficult terrain floating over obstacles (two ways of doing it: lifting the weight up on elbows and pedals or quickly dropping down with elbows and feet). Heavy- pushing on the pedals down on easy safe terrain. Remember keeping light hands no matter what. This tip is from Brian Lopez's book.
Day
Dynamic pedal as per Fluid ride video (pushing on outside pedal while cornering). Inside knee out.
http://vimeo.com/41742406
The second acronym is linked to "Day" and deals with cornering.
L
Look at the exit of a turn
L
Lean the bike into the turn without leaning your body
R
Rotate hips (turn with your belly button)
Here you go: BLT Day LLR!
Friday, August 10, 2012
FOX DOSS TESTING
January 18, 1213 update:
Could not compress the post to lower it. This required a lot of down force.
To be fair Ed B. from Fox did an excellent job and issued the RA number right away. The post is traveling back to CA for evaluation. Ed said he will send the post back the same day.
So far excellent service that Fox is providing. Will update on the outcome.
FOX DOSS (Aug 2012- Jan 2013) with no service in Pacific North West. Too early to write the eulogy? Hope there will be some improvements! In the meantime what am I riding on? GRAVITY DROPPER TURBO LP! So far no problems!
January 12, 1213 update:
The Doss Post stopped extending. Checked air pressure. None! Added required amount with the shock pump, went for a ride, checked air pressure again. Only half was there and that is after one ride!
Changed shreader core, added required amount, will report after the next ride. Will submerge in water briefly to see if there are bubbles, not sure if that can damage the post.
January 3, 1213 update (Happy New Year!):
Jagwire ferrule works. A piece of tube attached to the seat hanging over the post actuation lever works. 10+ rides in wet, rainy, muddy weather and no need to change the cable yet.
FOX needs to think of the sealed actuation system. Post itself works fine (sometimes it does not return all the way up, it needs a couple of "warm up cycles"). I got used to it, although it is annoying.
December 8, 2012 update:
Jagwire ferrule with extension at the post lever seems to work!Lever actuation has been good for 4 very rainy rides. However, sometimes I need to pull the seat UP to extend it fully. This particular aspect shows inconsistent functionality and I can't get rid of this behavior no matter what I try.
November 19, 2012 update:
I clamp the post in the same spot all the time and one day it would not return UP from the trail position. I followed troubleshooting instructions to no avail. Then for the heck of it I clamped the post at a DIFFERENT height at a DIFFERENT angle. The post returns perfectly!
Is it possible that clamping in the same spot induces some sort of internals fatigue over time?
Fox: pls make the actuation lever on the post itself shielded, sealed, like the Gravity Dropper or LEV or something like that. Seal it at the lever as well so it does not function as a funnel direting water in the housing. I had 3 rides in wet conditions with Jagwire ferrule and so far so good.
November 10, 2012 update:
It is very sad to say but DOSS is not yet suitable for Pacific North West. This is a heartfelt conclusion as I really like the post.
Here is why. After I changed cable and housing (see update below), I went for 3 rides in really really wet conditions, the way it rains on North Shore, 50-70mm in one day.
After these three rides lever actuation became very very hard. It seems that the housing gets contaminated quickly and it is not feasible to change cable and housing after 3 eight k rides. Every time it is a $12 expense.
My last attempt to alleviate this problem is installing Jagwire ferrule on the post that has a thin extension that prevents contamination. I also installed a piece of inner tube to cover the actuation mechanism on the seatpost hoping that it will deflect wet debris.
I will post one last update after 3 rides or so.
I hope FOX engineers will address this issue as the only good time to use the post is during a very short dry window here in the Pacific North West. This is a sad conclusion for me as I do want to believe in this product. The post itself works very very well....
Oct 28, 2012 update:
After about 15 rides in dry weather, it started raining heavily on North Shore. On my first ride in heavy rain I started feeling that I needed excessive pressure on the lever, especially when I wanted to lower the seat (not so much when I wanted to raise it). I changed the cable only, the problem persisted. I coped with the problem for 5 more rides. Big mistake! I changed cable and housing today. Actuation became very smooth.
I need to find out how long this smooth actuation will be there before the problem reappears.
Now that we are in the wet season and I have no idea about longevity of actuation mechanism in wet conditions. The design is such that water can easily enter the housing, that worries me a bit.
How often do I change cable and housing riding in wet conditions? We shall see...
Conclusion one: In dry weather, the post worked flawlessly.
Since there is no long term DOSS testing info online I decided to keep the riding log where I start using BRAND NEW FOX DOSS post
Trail: Bridal path on North Shore with some deviations. Length circa 8.500m. Elevation change 114m
Average use of the post lever per ride 20+. Mileage is totaled with each entry. Rider's weight 240lb (too much)
After Aug 16 I logged 15 rides in dry conditions, no problem.
Today (beginning of October) however it was poring rain. 2/3 in the same ride the remote lever started feeling very heavy and required a lot of force when trying to raise the post from the lowest position. Moving into/from other positions felt normal as usual.
I also noticed that the bracket on the seatpost that functions as a stop against which the post lever moves was a bit wobbly. Not sure if this is a problem. Remote lever has no problem and functions as usual.
Ideas:
Contamination of the post lever by dirt?
Remote lever adjustment problem?
Water?
I will see next ride if the same behavior persists.
Aug 3, 2012 Dry conditions 8,5km perfect function
Aug 5, 2012 Dry conditions 17kmm perfect function
Aug 8, 2012 Mild wet conditions, little mud spray on the post 25,5km perfect function
Aug 10, 2012 Dry conditions 34 km post lowered itself from the highest to the middle position
Aug 14, 2012 Very dry conditions 42.5 km perfect function
Aug 16, 2012 Very dry conditions 51 km perfect function
Monday, August 6, 2012
FIVE BIGGEST TIPS
At this stage I am working on what I call FIVE BIGGEST TIPS TO IMPROVE RIDING:
1. 3D riding on gravity assisted terrain - Be heavy or be light at any given point (alternate these two states all the time). Don't be ALWAYS heavy or ALWAYS light. Be like a wave: heavy-light-heavy.... (as per Brian Lopez's book) Here is a video example. Pay attention to pedals loading-offloading (especially at 2:45 onwards, but really throughout the entire video)
3. On steep downhill terrain balance on your PEDALS! This will tell how much back you should move. Heavy feet, light hands. Here it is very important unless you want to be a superman!
4. On downhill terrain move back as you go over the obstacle and as the bike dictates it at that particular moment. Don't set yourself back in advance. Otherwise you are a human catapult ready to shoot over the handlebars! (it is a bad thing, by the way)
5. Descend leading with your CHIN (this helps look ahead and keep the right ready/attack position). The chin should be low.
1. 3D riding on gravity assisted terrain - Be heavy or be light at any given point (alternate these two states all the time). Don't be ALWAYS heavy or ALWAYS light. Be like a wave: heavy-light-heavy.... (as per Brian Lopez's book) Here is a video example. Pay attention to pedals loading-offloading (especially at 2:45 onwards, but really throughout the entire video)
- Heavy- press into the pedals on easy smooth terrain
- Light- offload your weight (from the handlebar and pedals) on difficult terrain (offloading is done either "collapsing" DOWN (elbows and knees moving down) or moving UP by pulling and by taking the weight off the suspension
- 3D means that you move up and down (loading offloading) in addition to the 2D plane
3. On steep downhill terrain balance on your PEDALS! This will tell how much back you should move. Heavy feet, light hands. Here it is very important unless you want to be a superman!
4. On downhill terrain move back as you go over the obstacle and as the bike dictates it at that particular moment. Don't set yourself back in advance. Otherwise you are a human catapult ready to shoot over the handlebars! (it is a bad thing, by the way)
5. Descend leading with your CHIN (this helps look ahead and keep the right ready/attack position). The chin should be low.
Tuesday, July 10, 2012
Manual "Simon" style B
In addition to Endless Biking suspension compression down and forward, Manual can be done by:
1. No suspension engagement
2. Moving hips back just before the front wheel hits the drop (timing is everything) AND creating pressure on the palms of the hands.
Advantage of this move: it is very predictable and one does not rely on suspension response.
There is also racer style execution where the rider extends feet in the air reducing the height of the drop
Here is the video:
Arrows on the picture below indicate: pressure on the palms of the hands, hips back creating such palm pressure. Notice that vertical arrow indicates that the rider moves quite back over the rear tire for a split second. No suspension preload is used (unlike in style A) in this version of the Manual:

Wednesday, July 4, 2012
Manual- Style A
DISCLAIMER: This move can be dangerous. Seek professional instruction. The tips are for the author of the blog to serve as recall tips only. Blogger site degraded video quality that was originally filmed with 12 megapixels...
There are many ways to teach the "manual". This video is how I learned to do it at Endless biking. Fluid Ride teaches it differently.
1. Ready Position (I should be lower!):
 2. I push down on the pedals:
 3. I push then slightly forward on the pedals:
 4. Front wheel attitude in the air:
 5. Landing in preferably neutral low position (I should not be this far back):

There are many ways to teach the "manual". This video is how I learned to do it at Endless biking. Fluid Ride teaches it differently.
- I practice on small obstacles first so I get a feel for it and don't get hurt if something goes wrong.
- Technique: Just before the front wheel rolls over the drop I PUSH ON THE PEDALS DOWN AND FORWARD
- It is easier to do with a bit of speed
- WARNING: At higher speeds the push on the pedals may produce a very big violent jump, the faster I go the less of a push I exert and I always remember that the bike will be MUCH MORE RESPONSIVE AT HIGHER SPEEDS.
- Become quite small (attack position) before you do the "Manual"
- Seat should be low!
1. Ready Position (I should be lower!):


Tuesday, July 3, 2012
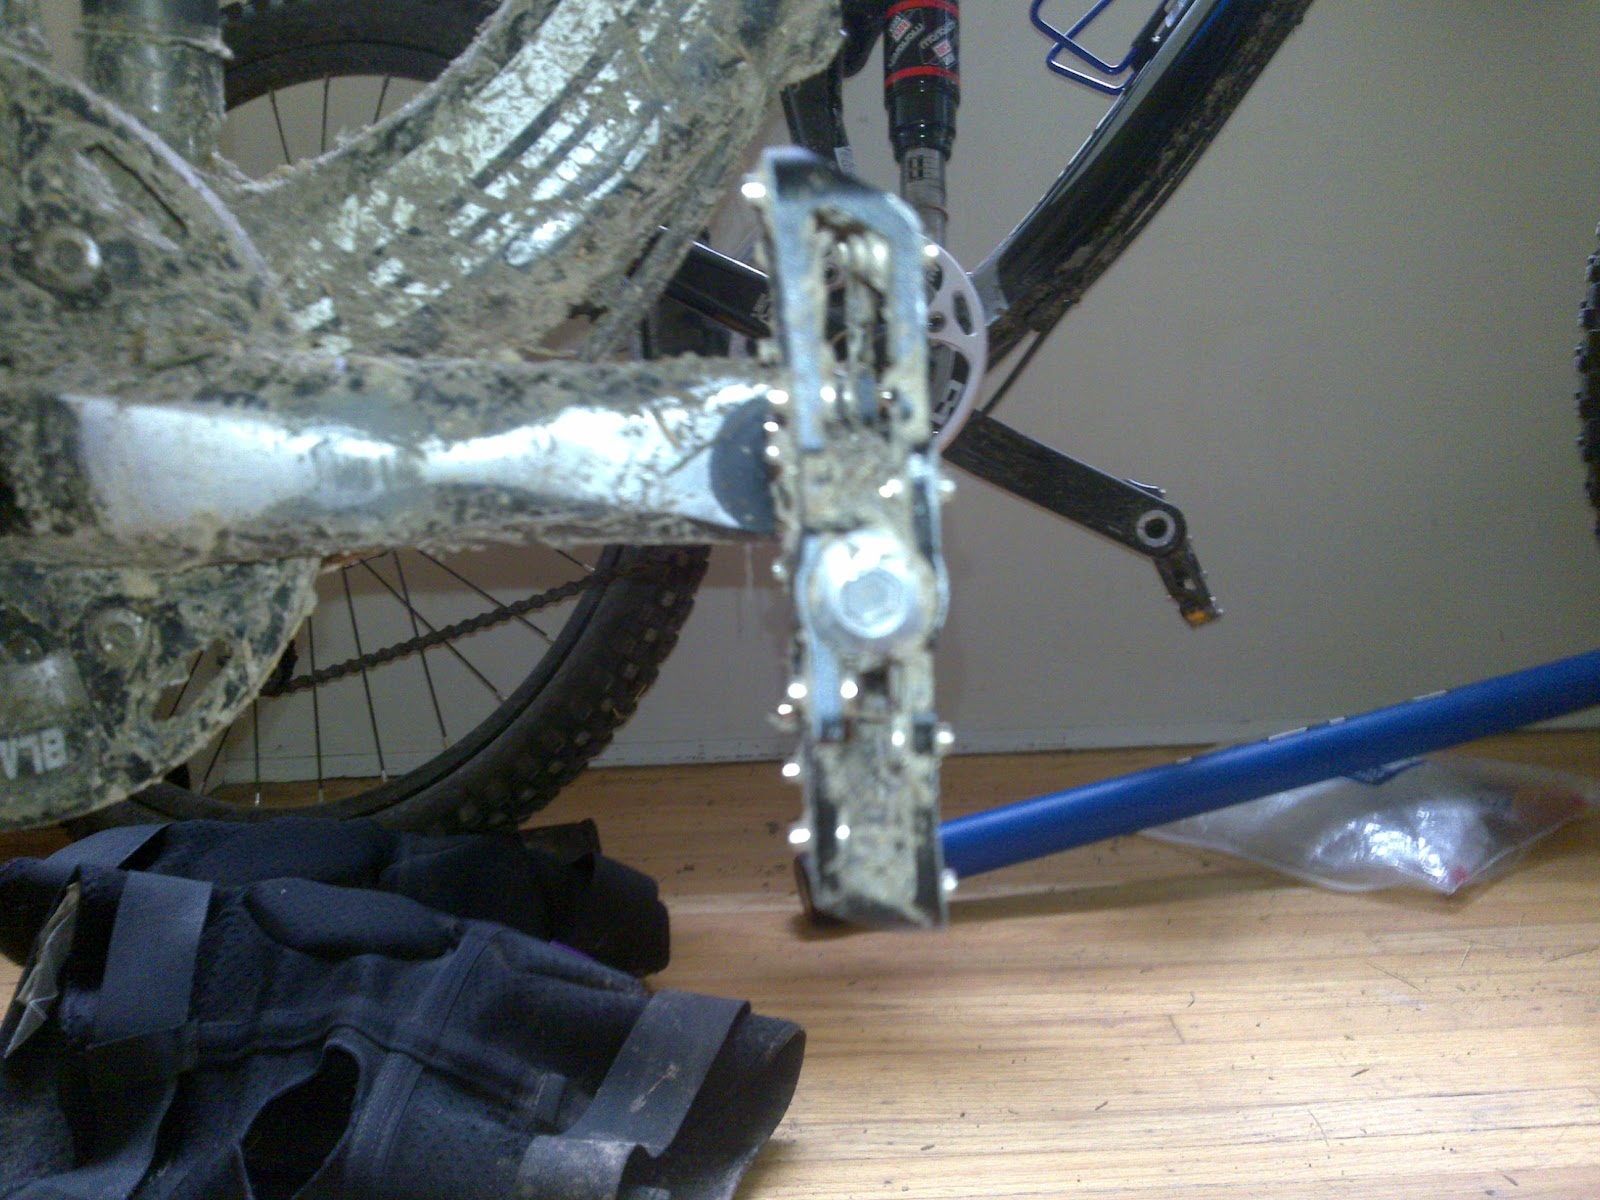
Platform pedals should be "skinny"
It took me almost two years to understand what good platform pedals are. It is not about a brand and type, they will all brake eventually, guaranteed!
It is about how thin or "skinny" they are! It is amazing how you can reduce pedal strikes by sticking to this one feature only. One can appreciate it only after having used "fat" or "fatter" pedals for a while.
For a month or so I have been using these MEC pedals and they work great. Here is the picture of what I consider good "thickness" of a platform pedal (these are Mec Double A pedals as per link above). They also should have a concave shape.
Another pedal that I want to try in the future is Deity Decoy 2.5
Wednesday, June 27, 2012
Rear Shock PSI "surprise" - a pleasant one
I rarely check rear shock pressure. I did it finally after a year or so today. Added 10 PSI (210 is my number). Results? Unbelievable difference in doing "Manuals" (compressing suspension down and forward). The bike has so much pop that I even landed on a rear wheel and did a wheelie! Unintentionally!
Cassette "surprise" meaning replace chain relpace cassette
In 90% of my riding I use the second biggest ring on my rear cassette.
As the chain wore out I obliged, payed $35 and bought a replacement.
With a new chain installed I went for a ride and the "teeth" slipped under load, very very annoying.
I spent some time tweaking shifting tension, shifting is great!
Key idea: I tried to climb using a different ring on the rear cassette, no skipping!
After 30 min of troubleshooting it occurred to me that I may have worn just one ring, the one that I use all the time on Bridal Path.
I stopped blaming rear derailleur, derailleur hanger, cage alignment (the potential absence of thereof) who knows what else... It is possible to destroy one single ring in a multi-speed cassette, what a bummer!
Brake pads "surprise"
Periodically check brake pads. I was checking them as lazy people do, I looked at them without removing the wheel.
The trouble is that by simply looking at the pads from a rider's vantage point not removing the wheel is trouble inviting. Pads may wear out unevenly. Without removing the wheel it may look that there is enough of braking material on the pads but in reality the pads may be completely worn out in the areas where you don't see.
Here comes a surprise. The end of the spring that spreads out the pads may not have enough of the "step" left to stay put as with newish pads and will simply escape, slide in the rotor area and will start making clicking noises. If this happens on a trail, you are in trouble.
Dislodged spring "whisker" is indicated by the arrow on the picture (of course this picture is an imitation and I placed the spring in a crooked way intentionally, to illustrate my point. Observe only the part of the spring indicated by the arrow, in the actual brake it will rub the rotor and the brake is compromised).

Friday, June 22, 2012
Reducing the height of the drop by getting small and extending legs
I found this picture on pink bike . What does it illustrate?
If you watch the amazing DVD created by Simon from "Fluid Ride", you will notice:

If you watch the amazing DVD created by Simon from "Fluid Ride", you will notice:
- getting small before the drop and with the subsequent leg extension erasing the height of the drop by quite a bit
- subsequent leg extension from being very small allows you to dictate bike placement on landing and not just sitting on top of it as an ejection seat
- basic technique: correct timing, hips back creating pressure on the palms of the hands preventing front wheel dipping
- linear helmet travel on the diagonal as per "racer style" explanation by Simon

Saturday, May 19, 2012
What is "BRAVE" when facing an obstacle?
My definition of being "BRAVE" when facing an obstacle is very specific:
As to item two, don't move back before the obstacle because it sounds safer to do so. Assume neutral LOW LOW LOW position as you approach an obstacle and AS YOU TRAVEL over the obstacle, let the bike DICTATE how much back IT WANTS YOU TO MOVE
- You must allow the bike to roll.
- Be brave by approaching an obstacle in neutral position (no matter how scary that might be) and then let the bike dictate how much back you will move as the bike TRAVELS OVER THE OBSTACLE
As to item two, don't move back before the obstacle because it sounds safer to do so. Assume neutral LOW LOW LOW position as you approach an obstacle and AS YOU TRAVEL over the obstacle, let the bike DICTATE how much back IT WANTS YOU TO MOVE
Saturday, May 12, 2012
How to acqure correct elbows position
Hand position determines correct elbow position while descending. Draw an imaginary straight line from index finger to the lower and opposite corner of your palm. Place this line on the handlebar.
Incorrect position:
 Correct position (pay attention to the arrow and how it "sits" on the handlebar):
 Such hand placement will also assure correct elbow position (as if doing a pushup or holding a basketball somewhere between the chest and belly button. Don't overdo it and don't protrude elbows too much forward. They will not be 90 degrees to the handlebar sticking out straight up. It would be too much). Do the same with the left hand.
Incorrect position:


Wednesday, May 9, 2012
MOST SIGNIFICANT TIP: Dynamic Pedal when cornering (Steering with inside knee: opening the Inside turn knee, dipping outside turn pedal)
Tried it on May 11, 2012. I will corner always like the info below from now on. It is an amazing tip that works!
I ride right foot forward.
The tip in the video suggests: When cornering open the inside knee (which is unweighs this side of the bike) and as the result of such opening, the OUTSIDE PEDAL will be dipped a bit.
When I turn left: open the left knee- the right foot (pedal) will move forward and down.
When I turn right: open the right knee- the left foot (pedal) will move back and down.
Just like skiing! Man, this tip works!!!
Monday, May 7, 2012
Cornering (twist those hips, screw into the bike)
Disclaimer: These tips are for the blog author, pls seek professional instruction as this sport may be dangerous!
Great Reference on cornering: TWIST THOSE HIPS, SCREW INTO THE BIKE!
Hey coach series:
http://www.nsmb.com/5214-hey-coach-ep-1/
0. Brake before the turn
1. Drill: standing practice turning the bike on flat terrain by TWISTING THE HIPS (1:20 in the clip)
ADD Dynamic pedal idea in this drill
2. Turn with all three eyes (belly button is the third eye, imagine laser shooting from it, point with it!)
(2:15 in the clip)
3. Angulate the bike into the turn, not the body (2:28 in the clip)
4. Go screw yourself into the bike (2:37 in the clip)
BATHE :
Brake before the corner
Angulate the bike, not the body
Twist the hips (screw yourself into the bike in the direction of the turn)
Hand (I adjusted this from the original: outside hand is so that the outside elbow is high)
Explosive exit (I can't do it yet: put pressure with feet on suspension as you are unscrewing yourself: as you untwist towards the end [quote] "try pushing yourself up to neutral position with a powerful push through the heels of your feet. This should drive more traction but also generate some momentum and bring you to the neutral position quickly, ready for the next corner or trail challenge."
Hip Protection
 Disclaimer: These tips are for the blog author, pls seek professional instruction as this sport may be dangerous!
There is no absolute protection!
I learned that despite the fact that I wear padded shorts, there is no protection against hitting the hip point. All the padding happens to be below the waist line and I flew over the handlebar and acquired a spectacular bruise right where hip bone sticks out.
Interestingly, only few padded shorts manufacturers address this issue and I don't know how practical their solutions are in terms of not bothering the rider in the sitting position.
Therefore something to keep in mind: there is no absolute protection for everything.
Sunday, May 6, 2012
Upper Body
When descending I need to remember to keep upper body calm. Legs and arms should move, absorb the shock but upper body should not feel any storm. It should rest calmly balanced on four shock absorbers that humans have.
Disclaimer: These tips are for the blog author, pls seek professional instruction as this sport may be dangerous!
Disclaimer: These tips are for the blog author, pls seek professional instruction as this sport may be dangerous!
Sunday, April 22, 2012
Technique points I keep in my mind when riding these days
The key word on my mind on a downhill turn is ROTATE, just one word but occasionally also.....
1. Rotate the belly button and looking with "three eyes" when on downhill turn
2. Leaning the bike into the turn
3. Counterbalancing the leaning with the rear part as a result of belly button turn and resulting weight shift on the seat.
3. Having the outside turn elbow bent and high
4. Looking past the turn
5. Dynamic Pedal

Going downhill and in trouble
Disclaimer: These tips are for the blog author, pls seek professional instruction as this sport may be dangerous!
What if I am going downhill and sense possible trouble. What is the first thing to do?
GET AS LOW OVER BB AS I CAN:
-getting low over the central balancing point of the bike (over the seat area and BB). If I get low the rear will move back AS A RESULT OF GETTING LOW
-elbows a bit forward as if doing regular (not military style) pushups.Or as if you were holding a basketball at chest level.
This will not work is the seat is high (impossible to get low in this case). So people move behind the seat as a compromise. This is not ideal as:
-the bike is not centrally and evenly balanced
-arms are already extended and can't be used pushing the bike forward if needed
-front wheel is unweighted and is ready to slip sideways which means imminent fall
Telescopic seat post may be an answer to the above dilemma. One word of caution. Sometimes the telescopic seat may still be too high even if completely retracted. This may give a false sense of security as I endoed once thinking that I was low because I retracted the seat but I was still overall high.
The picture provided helps understand this point. The seat is clamped in such a way that it will be still way too high for OVERALL (albeit fully retracted) downhill height for me.

Wednesday, April 18, 2012
Body bosition before ROLLING steep terrain( steep rock, ladder, etc.)
Disclaimer: These tips are for the blog author, pls seek professional instruction as this sport may be dangerous!
For rolling steep rocks, ladders, steep rolling terrain as well as position before doing a manual!
Be very LOW LOW, elbow bent like if you are doing a pushup (or as if holding a basketball at chest level). At the same time elbows are NOT too much forward. Seat all the way down, no sitting, cowboy legs. Front heel dropped.
To correct: I tend to have my rear too much back approaching an obstacle I am trying to attack. Approach the obstacle with the rear being a bit more forward over BB. Don't forget doing it!
See first three pics (source reference: http://www.pinkbike.com/video/221262/ and http://www.endlessbiking.com/uploaded_images/IMG_0606-1-718941.jpg ) with the ready position before rolling steep terrain (chicken wings, cowboy knees, getting very low over BB, then extending arms straight down as the roll starts, it is a very subtle extension):
 |
| http://www.endlessbiking.com/uploaded_images/IMG_0606-1-718941.jpg |
 |
| START OF THE ROLL |
 |
| ONE MORE PICTURE OF THE ROLL START |
 |
| ARMS EXTENSION Extending arms straight down (it will look as the extension is down and forward but it is a subtle downward movement only. It also helps move the rear back. The bike will move the arms forward, NOT the rider. The rider remains very low) |
Friday, April 13, 2012
Less immediately known to a biginner things that come loose
1. The bolt that hold rear derailleur (was very loose after a year of riding, I discovered it by accident)
2. The bolt that holds rear derailleur hanger (when I take the rear wheel off, I tend to check it)
3. The pivot bolt that is behind the bottom bracket (watch for this one!)
Disclaimer: These tips are for the blog author, pls seek professional instruction as this sport may be dangerous!
2. The bolt that holds rear derailleur hanger (when I take the rear wheel off, I tend to check it)
3. The pivot bolt that is behind the bottom bracket (watch for this one!)
Disclaimer: These tips are for the blog author, pls seek professional instruction as this sport may be dangerous!
Wednesday, April 11, 2012
Vertical Manual Drops
Disclaimer: These tips are for the blog author, pls seek professional instruction as this sport may be dangerous!
Manual is done by me without pedaling and in two steps:
1. Staying low preloading down suspension the last moment before the drop pushing down on the pedals
2. Pushing with the front foot towards the hub of the front wheel (such motion will MOVE THE BIKE FORWARD UNDER YOU and as a consequence will shift your body back extending forward arms and legs. Do not pull up on the handlebars, the leg force towards the front hub in this step will prevent the front part of the bike from dipping). KEEP THE FRONT HEEL BENT DOWN in this step!
Start returning to the ready position while in the air so when landed you landed low in ready position and not shifted back.
Match the bike traveling in the air with the angle of the landing area (angled the same way to match)
Pedal several bike lengths before the manual maneuver area. COAST before, during and after doing the manual.
Speed will help doing the manual and will prevent dipping of the front wheel.
PRACTICE UNTIL YOU CAN DO IT AT A VERY LOW SPEED
Manual summary: don't pedal when you are about to manual, preload suspension pushing down, push with the front foot with the dropped heel towards the front hub of the bike. This will move the bike forward and you will naturally extend arms and legs and the rear part of the body will be moved back. Don't move your body back, let it happen as a result of pushing the pedals towards the hub of the front wheel.
Vertical drops (low speed) up to 2/3 of knee height
Disclaimer: These tips are for the blog author, pls seek professional instruction as this sport may be dangerous!
These drops can be steep step-like roots, steep rocks and steep ladders.
STAY LOW LOW LOW approaching the drop.
DO NOT move back in advance when you are still riding on flat terrain before the drop. LET THE BIKE DICTATE HOW MUCH YOU NEED TO MOVE YOUR REAR BACK AS YOU GO OVER THE OBSTACLE, NOT BEFORE THE OBSTACLE.
My rear should not be back but balanced over BB.
As you drop pushing straight down on handlebars there is an illusion that the butt moves back, it does not: the bike angles nose down and creates such illusion. If I stay back, front wheel will loose pressure and traction.
The acceptable height of a drop to attempt with such technique can be measured by standing next to it with hands on the same line as the top edge of the drop (imagine that the top imaginary line of the drop edge is the handlebar). Extending arms down should be such that hands touch the bottom of the drop. The drop height should be no more than full arms extension from the top to the bottom of the drop. This also about 2/3 of my knee height. If the drop is BIGGER than the full arm extension this technique should NOT be used.
Doing the drop I get low low low low in the attack position, push the handlebars straight down, (it is a subtle push if it is a rolling long rock or ladder) NOT forward. I Don't move back, I stay neutral hovering over the seat (Bottom bracket) area, and I don't sit.
Assume ready position right after the drop is done. The technique allows for a very quick return to the ready position to address right away other obstacles.
Mistake: moving/shifting back. Getting low WILL move the rear back but as a "side effect". Pushing forward instead of down.
I use the same technique when rolling off the rocks and skinnies (On the picture below I pushed down in a subtle way on handlebars on the final steep part of the skinny (which is by the rear wheel on the picture). I also made sure that I was LOW LOW LOW with (doing a pushup or holding a basketball like) elbows and centrally balanced (not positioned back with extended arms, bad idea!)
Angling the palms on the handlebars can help maintain correct elbow position

 On the obstacle on this last picture I used exactly the same technique pushing down on handlebars and being low and centrally balanced.
I use the same technique rolling off relatively long steep rocks and long ladders. There are two adjustments to make. As usual start with chicken wings in a low low low position centrally balanced over BB, then:
1. There is a subtle extension of the handlebars DOWN when the front wheel starts rolling down (as the technique described above) and a bit of a hold as you roll the long rock or long ladder. As the front wheel touches the "landing area" absorb the curve with the arms and get back into low low centrally balanced position with chicken wings.
Slow speed drop technique works on the similar to these features as well:


These drops can be steep step-like roots, steep rocks and steep ladders.
STAY LOW LOW LOW approaching the drop.
DO NOT move back in advance when you are still riding on flat terrain before the drop. LET THE BIKE DICTATE HOW MUCH YOU NEED TO MOVE YOUR REAR BACK AS YOU GO OVER THE OBSTACLE, NOT BEFORE THE OBSTACLE.
My rear should not be back but balanced over BB.
As you drop pushing straight down on handlebars there is an illusion that the butt moves back, it does not: the bike angles nose down and creates such illusion. If I stay back, front wheel will loose pressure and traction.
The acceptable height of a drop to attempt with such technique can be measured by standing next to it with hands on the same line as the top edge of the drop (imagine that the top imaginary line of the drop edge is the handlebar). Extending arms down should be such that hands touch the bottom of the drop. The drop height should be no more than full arms extension from the top to the bottom of the drop. This also about 2/3 of my knee height. If the drop is BIGGER than the full arm extension this technique should NOT be used.
Doing the drop I get low low low low in the attack position, push the handlebars straight down, (it is a subtle push if it is a rolling long rock or ladder) NOT forward. I Don't move back, I stay neutral hovering over the seat (Bottom bracket) area, and I don't sit.
Assume ready position right after the drop is done. The technique allows for a very quick return to the ready position to address right away other obstacles.
Mistake: moving/shifting back. Getting low WILL move the rear back but as a "side effect". Pushing forward instead of down.
I use the same technique when rolling off the rocks and skinnies (On the picture below I pushed down in a subtle way on handlebars on the final steep part of the skinny (which is by the rear wheel on the picture). I also made sure that I was LOW LOW LOW with (doing a pushup or holding a basketball like) elbows and centrally balanced (not positioned back with extended arms, bad idea!)
Angling the palms on the handlebars can help maintain correct elbow position


I use the same technique rolling off relatively long steep rocks and long ladders. There are two adjustments to make. As usual start with chicken wings in a low low low position centrally balanced over BB, then:
1. There is a subtle extension of the handlebars DOWN when the front wheel starts rolling down (as the technique described above) and a bit of a hold as you roll the long rock or long ladder. As the front wheel touches the "landing area" absorb the curve with the arms and get back into low low centrally balanced position with chicken wings.
Slow speed drop technique works on the similar to these features as well:


Friday, April 6, 2012
Cornering- my formula
Disclaimer: These tips are for the blog author, pls seek professional instruction as this sport may be dangerous!

http://www.pinkbike.com/news/Video-of-the-Year-Winner-is-2012.html
In the picture above one can see correct body position while cornering (hips are rotated and offset to the side, shoulders and belly button turned into the corner, high outside elbow, bike is leaning into the corner.
I noticed it is hard for me to remember and cycle in my brain through BRAKE-ROTATE-LOOK-LEAN mantra.
So here is my simplified one and it is all about STEERING WITH BELLY BUTTON:
Belly Button- High outside elbow
You look with all "three eyes" (belly button being one, then you think about high outside elbow (e.g if you turn left, I should have right elbow bent and high.
Rationale:
When you turn with the belly button, this move rotates your hips, shoulders and offsets the rear part of the body. This also forces me to look in the right direction.
High outside elbow will force me to lean the bike.
I will not forget to adjust the speed before I do all of the above because...I really don't want to fall!
So new mantra is again
Belly Button- High outside elbow- and as of May 11, 2012 Dynamic pedals
Wednesday, April 4, 2012
Forward and back movement on the bike
Disclaimer: These tips are for the blog author, pls seek professional instruction as this sport may be dangerous!
This is a very subtle point:
MOVE THE BIKE UNDERNEATH ME FORWARD AND BACK, NOT THE BODY.
It is the same as standing next to your bike and moving it forward and back.
This is a very subtle point:
MOVE THE BIKE UNDERNEATH ME FORWARD AND BACK, NOT THE BODY.
It is the same as standing next to your bike and moving it forward and back.
Fast cornering
Disclaimer: These tips are for the blog author, pls seek professional instruction as this sport may be dangerous!
Sequence: Brake -rotate-look-lean
I Get LOW into ready position
1.Brake to enter the turn at the right speed. Try to enter wide
2. Rotate hips and shoulders (move hips to the outside of the turn, belly button looking inside the turn). Hips and shoulders rotate in the same plane, bum sticks out to the outside of the turn
3. Look past the turn towards the exit. Don't look on front tire or directly in front.
4. Lean the bike into the turn, have outside elbow high and bent
USE DYNAMIC PEDAL IDEA !
Chest should stay low, drop heals down. Stick out high outside turn elbow
Note: For aggressive maneuver: While hips move in the opposite direction of the turn, with bum sticking out outside of the turn, upper body may lean INTO the turn
If I feel I am not making the turn, push down on the pedals to compress suspension.
This may result in two things:
a) the bike falls on the side and there is a good chance not falling with it
b) tires will bite more, turn radius will decrease and you make the turn
EB Riding Tip:
http://www.endlessbiking.com/guides.htm
Cornering tip: To develop solid cornering skills
for moderate to high speed flat corners, try rotating your torso to look
into the desired direction of your turn with 'all 3 eyes'. As you
increase speed, get lower and lower to keep a low centre of gravity, to
be able to lean the bike over farther to gain traction and maintain
momentum! Have fun!
Thursday, March 29, 2012
Trick to try going over an obstacle while climbing
Disclaimer: These tips are for the blog author, pls seek professional instruction as this sport may be dangerous!

Cell phone case and the glove for the obstacle height reference
I should be standing or partially standing
Roll the front wheel over an obstacle
Compress suspension and hop over the obstacle with the rear wheel
I keep the front heel low
Wednesday, March 28, 2012
Cornering- lean the bike into the corner- NOT your body
Disclaimer: These tips are for the blog author, pls seek professional instruction as this sport may be dangerous!
When cornering I try to do this:
Lean the bike into the corner
but DO NOT lean your body into the corner, keep it VERTICAL
Keep your body straight up.
What helps in achieving it:
PUT MOST WEIGHT on the OUTSIDE pedal and keep that OUTSIDE heal DOWN (lowered outside heal lowers your center of gravity and applies max pressure on the outer knobs of the tires)
Put OUTSIDE knee against the frame if needed
Keep OUTSIDE ELBOW HIGH (VERY IMPORTANT it helps keeping your body vertical, it is a good thing to use as a conscious mental check
LOOK to the corner exit point
USE Dynamic pedal idea
Elbow position on steep climbs
Disclaimer: These tips are for the blog author, pls seek professional instruction as this sport may be dangerous!
When I have to muscle up a very steep section this is what works well for me:
Imagine someone attached ropes to your elbows and pulling on them up so they are parallel to the chest line (or armpit to armpit line). Elbows are bent and are pointing up.
This prevents the front wheel from going up in the air and puts more weight slightly forward.
May 12, 2012 update:
Do NOT keep elbows in this extreme forward position when descending.
Correct descending elbow position is as if doing a pushup or holding a basketball at chest level
Straight Line riding-Keep those heels down
Disclaimer: These tips are for the blog author, pls seek professional instruction as this sport may be dangerous!
Heel position-straight line traveling:
Keeping heels DOWN (especially the front pedal heel makes for a much better, relaxing, obstacle- absorption- ready ride)
Heel position-straight line traveling:
Keeping heels DOWN (especially the front pedal heel makes for a much better, relaxing, obstacle- absorption- ready ride)
Monday, March 26, 2012
Momentum as THE KEY to success
Disclaimer: These tips are for the blog author, pls seek professional instruction as this sport may be dangerous!
It took me a while to figure out what helps me roll over an uphill, flat or downhill obstacle on a tough part of the trail where I could not before...
The answer is MOMENTUM!
Even with a very tiny and modest momentum one can roll over surprisingly difficult stuff. This can include an acceleration or more often simply NOT SLOWING DOWN in regards to the initial approach speed.
Thursday, March 15, 2012
How do I measure success?
Disclaimer: These tips are for the blog author, pls seek professional instruction as this sport may be dangerous!
Beyond the obvious: not falling and not stumbling where I used to fall and stumble. Beyond endurance: riding bigger distances between resting. What else is left then?
Here it is:
The true measure of better technique and performance is whether you can go over difficult sections in GRANNY gear in places where you used to employ the MIDDLE chainring!
Why? It takes more skill and technique to ride in GRANNY gear. You can no longer rely on torque availability to get out of trouble. You have to rely instead on correct body position, weight distribution, correct speed approach, momentum, etc.
Sunday, March 4, 2012
How many scoops of Stan's for a heavy guy?
Disclaimer: These tips are for the blog author, pls seek professional instruction as this sport may be dangerous!

Three. For 240 lb of a person this seems to work the best. 2+ months of riding-no pressure lost
Update March 26, 2012 3+ months going strong no issues
Universal gear combination for Bridal Path
Disclaimer: These tips are for the blog author, pls seek professional instruction as this sport may be dangerous!
After experimenting for a while, I decided that Granny and Second Biggest rings on a 9 speed cassette is the combination that can be used on any stretch of the Bridal Path.
Two Exceptions where I would use the Middle upfront and the Biggest in the back:
-Entry point to Suicide Connector (going west) and
-The entrance on Bridal Path by the golf course by the fence (going west)
March 29, 2012 update: I can use the Granny and the Second biggest ring in the back EVERYWHERE on BRIDAL PATH NOW. My knees are saying thanks...
For increased cardio workout, I would use Middle chainring upfront and the biggest one in the back for the entire trail.
Saturday, January 7, 2012
Another picture of the toughest climb on Bridal Path
 Disclaimer: These tips are for the blog author, pls seek professional instruction as this sport may be dangerous!
This is the hardest climb for me.
I did it once using GRANNY gear up front and SECOND BIGGEST ring in the back ("my magic gear"). Seat post fully extended, climbing in sitting position.
"Magic gear" for climbing on Bridal Path

Disclaimer: These tips are for the blog author, pls seek professional instruction as this sport may be dangerous!
I discovered a gear combination that works practically for any kind of difficult Bridal Path terrain that requires any kind of climbing over obstacles.
It is GRANNY ring up front, SECOND BIGGEST gear in the back.
Here i one example of a little tricky rooty climb at the beginning of Suicide connector going East
Thursday, January 5, 2012
Deceptively easy climb- Bridal Path going East
 Disclaimer: These tips are for the blog author, pls seek professional instruction as this sport may be dangerous!
This small climb is tricky as it involves several small turns and one needs to calculate them so pedals don't hit the side roots and the log.
Successful for me gear combination: GRANNY and SECOND BIGGEST ring in the back. Did it is sitting position.
I used to do it with the MIDDLE ring and the BIGGEST ring in the back but it is less smooth and most likely I will need to stand. Too much available torque (the use of the MIDDLE ring up front) I find on such stretch is not necessarily good.
Climb going towards Golf course (East)- Bridal Path
 Disclaimer: These tips are for the blog author, pls seek professional instruction as this sport may be dangerous!
It's all about gears!
I had hard time at the top of this climb turning right and going over some roots.
MIDDLE ring up front and BIGGEST in the back did not work well for me.
Successful gear combination: GRANNY and SECOND BIGGEST ring in the back.
I tried to stay to the left as much as possible before turning right and going over the roots. It worked.
I was sitting while climbing this part.
Wednesday, January 4, 2012
MAVIC UST 819 tubeless setup

Disclaimer: These tips are for the blog author, pls seek professional instruction as this sport may be dangerous!
After a month of riding my rear tire started losing too much air (i left the tire inflated to 22 PSI overnight and in the morning it had hardly any air)
The original setup was : Mavic UST 819 rim, Mavic stem, Maxxis Minion 3C 2.5 tire. 2 scoops of Stan's sealant.
Today's modifications: cleaned all solidified Stan's, added 3 scoops of sealant instead of 2, added Stan's rim strip.
Inflating with the rim strip was very easy using the floor pump which was not the case in the original setup.
I will post updates to keep track when the setup may fail...
Update 1.
Jan 6, 2012
First ride excellent! No air loss at all.
Update 2
May 1 , 2012
Detected air loss, dismantled the tire, found quite a bit of dirt where the rim clinches the tire, cleaned all, added sealant, re-inflated, all works well. Conclusion: I have to watch for the dirt in the "clinching" area and clean it once in a while. I will try adding a little bit of sealant once a month, rather than waiting for the next significant air pressure loss
Sunday, January 1, 2012
Scariest stretch on Bridal Path
 Disclaimer: These tips are for the blog author, pls seek professional instruction as this sport may be dangerous!
This is where I flew over handlebar and hit the hip pointer. Result: huge painful hematoma.
Descending and making a relatively sharp turn is still the biggest weakness. So I walk biting putting a lid on the ego. Ego has no hips that may hurt after all...
Toughest climb
 Disclaimer: These tips are for the blog author, pls seek professional instruction as this sport may be dangerous!
If for the long time I can't climb a certain stretch, I am most likely use the wrong gears!
This is the steepest climb on Bridal Path that finally after many months I was able to do on Dec 31, 2011.
Some guy suggested this gear combination:
GRANNY up front and the SECOND BIGGEST ring in the back.
I climbed it mostly sitting and to my biggest surprise I did it.
Until this attempt I was using the MIDDLE ring up front and the BIGGEST one in the back, no way it was doable!
Subscribe to:
Comments (Atom)